G Bar G Bronc Saddles - Bronc Saddle Information
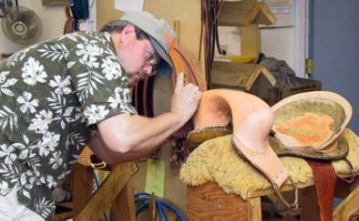
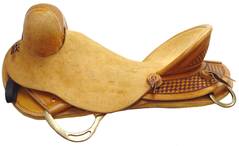
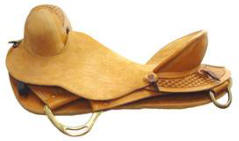
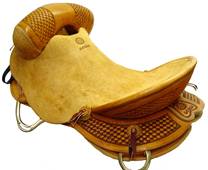
The base for a good bronc saddle is the tree and ground seat. The past several years we have been working on our G Bar G Gold Bronc Saddle to get the tree back to the way it was years ago. Through time little changes were made, some I made and some the tree shop made. We now feel we have the old shape back and great quality we have never changed. Now we have two great styles to choose from.
The tree is made of wood covered with rawhide. The G Bar G Gold design is from our own knowledge and work acquired over the past 30 years with the help and design from (4) different styles of Gold Seal Hamley Saddles. The design helps the saddle sit high, with no rocking on a large variety of horses and the flair of the back bars keep the saddle from snapping back, at the same time made so as to never hurt a horse.
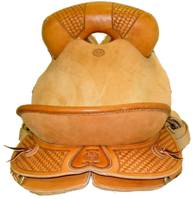
The G Bar G Gold style ground seat is constructed so you sit as deep as possible. The cantle is what we call a Beaver slide type cantle. It's designed to allow you to slide down in the seat and force your legs up under the swells. There are many saddles that have high cantles, but they only force your upper body forward and against the swells, but this throws your body out of position for the next step in your spurring ride. That is the reason for our design; to get your pelvis tipped forward and your leg up under the swell which positions your feet high in the neck of your bucking horse.
When you spur high in the neck and set yourself so you can be in the position to spur back to the cantle and snap back to the front end before the horse's feet hit the ground.
We have made a major change in the bar setup to help make the saddle sit higher on the horse, but also take the pressure off the stirrup leathers. This will help narrow the front end down, as well, and help you get around the corner to set your feet.
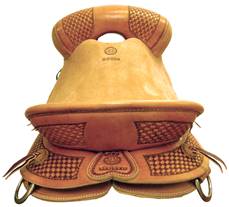
Our new G Bar G II, has several changes from our G Bar G Gold. First, we changed the front end or swells. They sit so you have a deeper swell. They do not have a definite pocket, but allow your leg to have equal contact throughout the spur stroke.
The ground seat makes the saddle feel much narrower and deeper seated. The cantle is deeper dished and wraps around further with a relief for your tailbone. This is a different feel than our G Bar G Gold.
The bars are designed for the saddle to sit up well in front, but take the pressure off your stirrup leathers, thus allowing easier forward motion. The bars flatten out in the seat to allow a deeper seat and also set you up for more extension to the front end, allowing you to get higher in the neck and set your feet without resistance.
The G Bar G Gold and G Bar G II swells are basket stamped and buffed in the leg area, because rosin sticks well, but doesn't build up as fast. Rosin heats faster and sticks better when in thin layers. By using the grain side of leather, you don't have to scrape the rosin as often. This makes your swell covers last longer and still gives you the same performance. Rough out swells can be made if you so choose.
The seat is rough-out to give you equal friction over the entire seat area, thus giving you a more secure ride yet a ride with smooth movements. The cantle binding is hand sewn to give a tight fit and long life. It is set so it does not bite you during the ride, but lets you slide in and out of the saddle in a smooth, floating motion.
The back rigs are designed to give strength and balance to the saddle and positioned to keep the saddle from snapping back. They are lined with Indian Tan Latigo for longer wear and strength.
The front rig is attached to the tree with (6) 1 1/4" screws on each side for long lasting strength. We use American made E-Z Dee of brass for strength, yet flexible enough to stop any stress breakage.
The front rigs are set as specified in the rules set by the PRCA and other association rule books.
The skirts are single layered except for the front portion, which is doubled to give firmness and to keep out folds or wrinkles in the area your stirrup leathers slide over. This allows a full stroke back to the front without any catching or jerking motions.
Latigos are made of the best German harness leather for strength and ease of pulling. We use harness leather as our own preference because we feel you don't get the slip or loosening with Latigo leather that you sometimes get with nylon Latigos.
The cinch is a 33 strand, 30" cinch with a solid woven center bar to give you the wide cinch specified in your association rule books. The Dee rings have been designed so you have a flatter area where the latigos fold over. This stops the cracking on the outside edge of the latigos and gives you a longer life on your latigos. A little baby powder applied to your latigos every few rides will keep your latigos pulling smooth and without a bubble or wrinkle.
The back cinch and billets are doubled and stitched for longer lasting strength and durability under normal conditions. The billets are designed lighter and will break before the back rigs are torn out during a bad wreck. The billets are more accessible on the road and a lot easier to put in than a back rig.
Stirrup leathers have changed so much over the past few years. We use a special, hard leather on the outside and two layers of belting on the underside. This gives you a stirrup leather that stays firm, but folds or breaks over better. They stay about the same firmness for a longer time. Next we have the same leather on the outside with a strip of nylon through the center to stop any stretch and a layer of sole leather underneath. This gives you a little more snap, but because it is leather, it will break down sooner than the synthetic. The third kind is hard. It has the same leather top side, a layer of belting in the middle and a layer of sole leather on the bottom. This is much harder and has the most snap.
We reconnect the leathers with the doubled belting for the bronc rider that is just starting, because it folds or breaks over cleaner and enables you to start a smoother spur stroke. The others are personal preferences.
We have Extra Short (up to 30" inseam), Short (30-32" inseam), Regular (32-34" inseam), Long (34-36" inseam), Extra Long (38" and up inseam.) These sizes will change with the size of saddle used and thickness of the leg, but work as a starting point for your size. Any unused or undamaged leathers can be sent back for exchange, with only the return freight paid by you.
To cut cost and make it more convenient for you to set your leathers, we make a Half leather. This is only the doubled portion of the leathers. You cut your old leathers on the outside of the bar about half way between the top of the bar and the middle of the swell at the bottom. This puts a swivel in your leathers and helps take out bubbles and prevents outside leathers from laying too low. The Half Leather is attached to the old outside leather by a nylon lace that comes with the Half Leathers. If you should have a quarter bind break, your leather would still be held together, preventing you from taking a nasty buck off. The stirrup leathers are now made with quarter bind holes in them. These are lined with nylon and heated to keep from tearing out or fraying. The same is done with the Half Leathers.
When setting your new Half Leathers for length in your saddle, the following helps to get them correct without many changes. Mark your holes in your quarter binds, binds and buckle holes in your leathers. Lay your new Half Leathers on top of the old ones when you get them out. Mark the old holes on the new leathers before putting the new ones back in. After inserting leathers in and bringing the flap over the top of the bar, fasten the quarter bind in the hole used before. Now sit in the saddle and check your length. It should be very close to what you had when you had your old leathers in. Not only have you set the length, but you have set your quarter binds and now have cantle pressure. Next mark the top flap in the new half Leathers on the outside half way between the top of the bar and the middle of the swell at the bottom. Punch two holes in the Half leathers and also in the outside old leathers so they can be laced together with at least half an inch between them or whatever distance it takes to set the correct bubble on the outside leather.
Your leathers are marked with a number and a size, such as "Regular 10". This shows the size and the number "10" is for our use in keeping the pairs together when they are cut until they are finished. This keeps the leather matched for performance.
Your body size and ability will determine your best saddle size. The following sizes have been updated as to what everyone is looking at now. I personally think you should stay to the shorter end of the saddle in your size if you are just starting out.
5'5" to 5'7" use 15-1/2 to 16" seat
5'8" to 5'10" use 16 to 16-1/2" seat
5'11" to 6'1" use 16-1/2" to 17" seat
The largest size we make is 17-1/4" seat. Just remember, for security - shorten. For extension of the leg into the front end, go longer.
Your saddle is designed so you can sit down in it and still reach high in the front end. If you ride too short of seat, it tends to put your upper body forward and upper leg straighter down, causing it to be harder to spur over the point of the shoulder. You always need to keep your shoulders behind your hips to put pressure down on your butt. When you lift on your rein, this forces your body weight down in the seat, as long as your shoulder is behind your hip. If it is too long it causes you to slide back and forth in the saddle. If you slide away from the cantle when the horse hits the ground and then back to the cantle when the horse leaves the ground, you will eventually get behind on your timing.
After you have determined your seat length, sit in your saddle and adjust your stirrups leather length so you have just a little cantle pressure. To tell the cantle pressure, straighten your legs, putting pressure in your stirrup leathers. This should push you against your cantle, but not up the cantle and then relax your pressure. This should allow you go slide forward away from the cantle 1/2". If you have more movement than that you will need to put a block or a half hole in your stirrup leathers. A block is a piece of skirting leather with holes in it matching the holes in the stirrup leathers. Place this on the outside of the stirrup leathers, but under the roller on the buckle; this shortens your leathers. You can use up to 2 blocks of leather. If this doesn't shorten the leathers enough, take the stirrup leathers up one hole. Remember, the side on which you hold the rein should be just a little shorter than the other. For instance, if you ride right handed, your stirrup leather on the right side needs to be just a little shorter. This keeps your hips and shoulders square in the saddle.
Now that you have achieved the proper length of your leathers, you are ready to set your anchors or quarter binds. Our new leathers and half leathers have the quarter bind holes in them so the next step for punching the binds can be skipped.
For the stirrup leathers needing quarter bind holes:
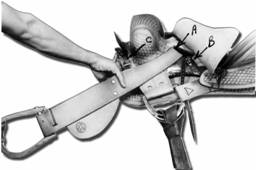
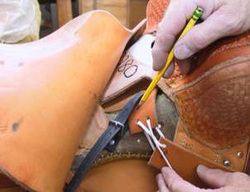
Notice the picture (Figure 1) and see that the stirrup leathers are held straight out and the stirrups straight up. This helps even out your leathers. With your fingernail or a pencil, put a mark at the top of the stirrup leather at point (A). Now slide the stirrup leather out over the bar about 2 to 3 inches to allow yourself room to punch your slot. Using a #3 or #4 round punch, put a series of holes that make up a slot approximately 1/2" long. To determine the proper place to put the slot, go back to the mark you put on the stirrup leather at the top of the bar. Move approximately 1-1/2 to 2-1/2 inches back toward the inside of the doubled portion of your leathers.
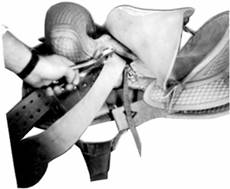
Start your first hole approximately 1/4" from the outside of the leather towards the front of the saddle. This puts the pressure on the full width of the leathers. Now punch the series of holes making up a slot as pictured in (Figure 2).
Taking the end of the anchor strap (B), put it through the slot and buckle. Tighten this until the outside leather or the one with the fender has about 3 to 4 fingers slack. Pull the stirrup leathers tight as in (Figure 1) and check with the other hand approximately at the top of the fender. Keep adjusting until you have at least a 3 finger bubble on the outside. The slack in the outside leather enables you to spur to the front with no stopping of the leathers until you are high in the front end. This helps set your feet in the horses neck when your weight is forced down in the leathers after the horses front feet hit the ground.
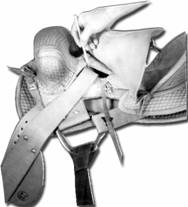
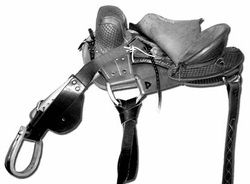 Figure 3
As explained in the Half Leathers installation, you can make a cut in your leathers and tie them back together with nylon, leaving slack in between the leathers for a hinge.
There is a photo of the finished job in (Figure 3)
There is a photo of the finished job in (Figure 3)
You can now check the length of the leathers. Sitting in your saddle with your legs straight out, putting pressure in your stirrup leathers, you will be forced up the cantle 1/4" to 3/8". When you relax you should slide back down in the seat. If you slide more than 1/2" up the cantle, loosen your anchor straps one hole, if not enough pressure, shorten the anchor straps. This is the procedure to get your cantle pressure. Double check after the anchor straps are set, that the 3 to 4 fingers bubble is not lost.
You are now ready to make the last adjustment, the front bind straps. You replace the seat and sit in the saddle. By holding on to the swells with your legs and rolling to one side slowly spur back. If your leg is forced up against the swell with pressure, you only need to make a small adjustment on the bind straps. (Figure 4). If your leg is forced in a rolling motion hard up against the swells, you need to back off on the bind straps until you lighten the pressure.
You are now ready to make the last adjustment, the front bind straps. You replace the seat and sit in the saddle. By holding on to the swells with your legs and rolling to one side slowly spur back. If your leg is forced up against the swell with pressure, you only need to make a small adjustment on the bind straps. (Figure 4). If your leg is forced in a rolling motion hard up against the swells, you need to back off on the bind straps until you lighten the pressure.
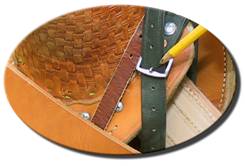 Figure 4
Alternate sides when adjusting so they stay even. Make sure your body stays in the middle of the saddle and turn your toes out while spurring all the way back to the cantle. During the adjusting process, move in slow strokes. This allows you to feel your movements and make proper adjustments.
Your anchor straps control the pressure in your stirrups from the flats of the shoulder to high in the neck. Your front bind straps control the pressure in your stirrups from the flat of the shoulder back to the cantle. There should be the same pressure throughout the spurring motion.
This will give you a good start on the adjustment of your saddle. If you have trouble, call the shop 307-851-4658 and we will talk you through it and answer any questions you might have.
